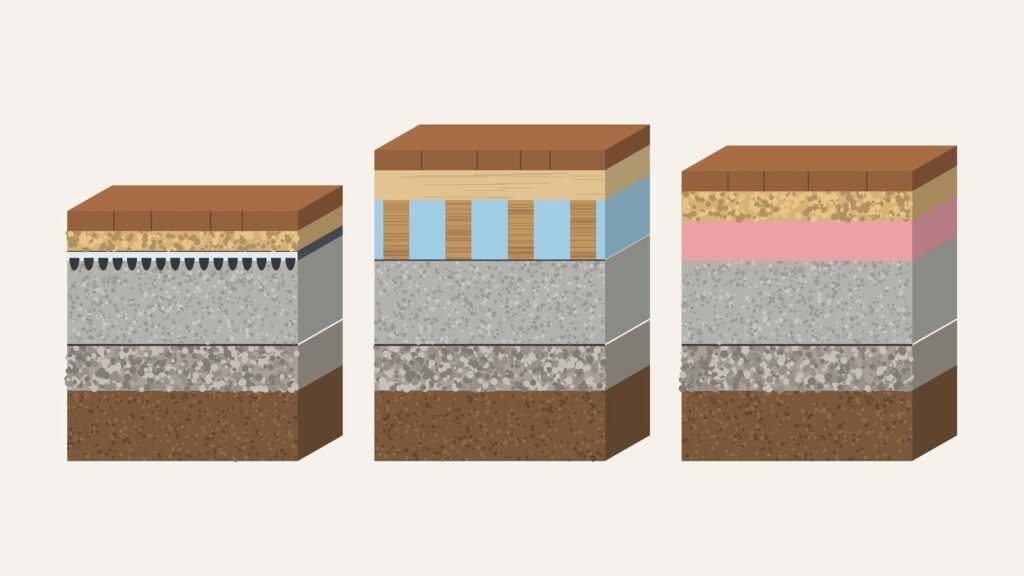
A finished basement floor is not one thing. It is a stack, and the layer most people never see — the subfloor between the concrete slab and the finished floor — decides whether the room feels warm and dry or cold and damp. This post is about that middle layer only: what goes between slab and finish, how each system handles moisture, how much headroom it takes, and when each one makes sense. For the finished-floor choices themselves, see our overview of basement flooring below grade.
Start with the slab, not the subfloor
Concrete looks solid, but it is porous. Moisture from the ground can move up through it as vapor, and a basement slab can feel cold because concrete conducts heat straight to the earth below. Any subfloor over concrete therefore has three jobs at once: keep moisture away from the wood and finish above it, break the cold path from the slab, and give you a flat, solid surface to build on. A system that does only one of those three will disappoint in one of the other two.
Two code and industry points frame the whole choice, and both are worth getting exactly right.
First, for a newly poured slab, 2021 IRC R506.2.3 (unchanged by Massachusetts’ tenth edition, which amended only R502.3, R502.11.1 and added R506.1.1 in this chapter) requires a minimum 10-mil vapor retarder conforming to ASTM E1745 Class A, with joints lapped not less than 6 inches, placed between the concrete floor slab and the base course or prepared subgrade. Its exceptions cover garages, utility buildings and other unheated accessory structures; unheated storage rooms under 70 square feet and carports; driveways, walks, patios and other flatwork not likely to be enclosed and heated later; and cases the building official approves based on local site conditions. Note the limit of that rule: it governs a new slab. For an existing basement, you cannot tell from above whether there is a membrane under the old slab at all — which is why a moisture test matters before you choose a system (see “Test before you build” below).
Second, on moisture limits, NWFA’s magazine guidance states: “A vapor retarder is always required when the moisture tests are >3 lb. by the Calcium Chloride test (ASTM 1869) method or 75 percent by the relative humidity (ASTM 2170) method.” In plain terms: NWFA treats 75% relative humidity, measured with in-slab probes per ASTM F2170, as the point above which a vapor retarder is required over concrete; the flooring manufacturer’s instructions set the final limit. If your test comes back above those lines, do not just pick a thicker panel — follow the flooring manufacturer’s instructions, and expect a vapor retarder to be part of the answer.
System 1: Dimpled-panel subfloor (DRIcore-type panels)
What it is, bottom to top: a high-density plastic membrane with a dimpled underside, bonded to an OSB top. The dimples hold the panel off the slab and create a continuous air gap, so moisture emitted from the concrete can evaporate and air can move underneath instead of sitting trapped against wood.
- Total height: current DRICORE Subfloor panels are 3/4 inch thick (23.25 x 23.25 inches); the insulated R+ version is 1 inch thick. That is the smallest headroom cost of the three systems here, which matters in a basement where every inch of ceiling height counts.
- Moisture: the air gap is the point. It separates the finished floor from the slab and lets the slab breathe, rather than sealing dampness under a flat sheet.
- Warmth: the standard panel is rated R-1.4 and the R+ panel R-2.7 in the manufacturer’s comparison — a modest thermal break, not a full insulation layer. If a cold floor is your main complaint, this system alone may not fix it.
- Best for: a dry, reasonably flat slab where you want the fastest install, the least height loss, and a floating floor that can be lifted later if you ever need access underneath. Leveling shims handle minor dips; a badly out-of-level slab needs leveling first, not more shims.
System 2: Sleepers + plywood
What it is, bottom to top: preservative-treated sleepers — typically 2x4s laid flat — fastened to the slab, with rigid foam fitted between them where insulation is wanted, and tongue-and-groove plywood screwed to the sleepers. A vapor retarder goes over the slab (and, in the common detailing, the sleepers sit on it or under it as the assembly requires — code requires sleepers on a slab in contact with the ground to be preservative-treated or naturally durable wood unless an impervious moisture barrier separates them from the slab, and most installers use treated lumber either way).
- Total height: a flat 2×4 is 1-1/2 inches, plus 3/4-inch plywood, so the assembly runs about 2-1/4 inches before the finished floor — roughly three times the height of a dimpled panel. In a low basement, that is the deciding drawback.
- Moisture: the sleepers lift everything off the slab, and the space between them can carry wiring or tubing, but wood framing is also the most moisture-sensitive part of this system. It only works with a proper vapor retarder and treated lumber; untreated sleepers against concrete are a rot risk, not a saving.
- Warmth: wood itself insulates very little. The warmth in this system comes from whatever foam you fit between the sleepers — leave those bays empty and you have mostly an air gap, not insulation.
- Best for: a slab that is out of level or needs services run in the floor, where you are willing to give up headroom for a solid, nail-down wood subfloor and a flat plane you control by shimming.
System 3: Rigid foam + OSB (XPS + plywood/OSB)
What it is, bottom to top: sheets of extruded polystyrene (XPS) foam laid directly on the slab, with OSB or plywood over them, the two layers glued and/or fastened into one floating assembly. This is the middle path: the foam is both the thermal break and the leveling layer, and the wood on top is the nailing and walking surface.
- Total height: it depends on the foam you choose — for example, 1 inch of XPS plus 3/4-inch OSB totals about 1-3/4 inches. Thicker foam buys more warmth and costs more headroom, in direct proportion.
- Moisture: XPS is closed-cell and does not absorb water the way wood or fibrous insulation does, but the assembly still needs its moisture detailing right at seams and edges, and the slab still needs its test before you cover it. Foam is not a substitute for a vapor retarder where one is required.
- Warmth: this is the warmest of the three per inch of height, because the whole layer is insulation rather than an air gap or wood framing. For a basement that will be a bedroom or family room used daily, that is often the reason to choose it.
- Best for: a flat slab where warmth matters most and you can spare roughly 1-3/4 inches or more of height. It is less forgiving of an uneven slab than a shimmed sleeper floor, since foam follows the slab it sits on.
How to choose, in one pass
- Height is tight (every inch matters)? Start with System 1.
- Slab is uneven or you need to run things in the floor? System 2, and budget the 2-1/4-inch height.
- The room will be lived in daily and feels cold? System 3, with foam thick enough to actually change the floor temperature.
- Slab tests wet (above the NWFA lines above)? Stop and deal with moisture first, per the flooring manufacturer’s instructions — no subfloor system on this list dries a wet slab.
Test before you build
Before any of the three goes down, test the slab. The two standard tests are the in-slab relative-humidity probe (ASTM F2170) and the calcium chloride test (ASTM F1869). NWFA’s line, quoted above, is 75% RH and 3 lb respectively, with the flooring manufacturer’s instructions setting the final limit — different products set different limits, so the number on your product’s instructions wins over any general rule. Our earlier post on whether basement walls need a vapor barrier, and what the code actually says about wall assemblies covers the wall side of the same moisture story.
The one-sentence version
The subfloor is not decoration: it is the layer that separates your finished floor from cold, damp concrete, and picking it by height, warmth, and moisture — in that order, after a slab test — is what keeps a finished basement feeling finished years later.
Basement Finishing of Boston finishes basements across Greater Boston — family rooms, home offices, gyms, and basement baths. Electrical and plumbing work is performed by appropriately licensed professionals as required. If the foundation shows active water, it needs professional waterproofing before any finish work starts — we check the walls and floor for this during the site visit.
Sources: 2021 IRC R506.2.3 (vapor retarder under new slabs, and its exceptions); 2021 IRC R317.1 (sills and sleepers on a slab in contact with the ground); Massachusetts tenth-edition residential Chapter 5 amendments (mass.gov — R502.3 and R502.11.1 amended, R506.1.1 added); NWFA, Hardwood Floors magazine, “Subfloor Focus: Minimizing Moisture, Part 2 — Use Vapor Retarders on Concrete Subfloors” (hardwoodfloorsmag.com); DRICORE Subfloor and Subfloor R+ product pages (dricore.com — panel sizes and R-values).